What Is PuLID?
PuLID stands for Personalised Latent Image Diffusion. It's an approach to AI image generation that preserves character identity across generations without any fine-tuning or LoRA training. You give it a reference image, and it uses that to lock in the character's core features — face, style, key physical attributes — while still letting you freely control the scene, pose, lighting, and composition via prompts.
The traditional solution to character consistency was training a LoRA on 15–30 images of your character, which takes time, compute, and storage. PuLID skips all of that. It works at inference time — meaning no training, no waiting, and no managing a library of character-specific model files. Just reference image in, consistent character out.
Why Use Flux GGUF with PuLID?
Flux is the current gold standard for open-source image generation — it produces exceptional quality, prompt adherence, and handles complex compositions and lighting better than older architectures. The downside has traditionally been the VRAM requirement.
GGUF quantization changes that. As covered in our Flux GGUF guide, quantized Flux models load dramatically faster and fit into much smaller VRAM budgets. The Q4 GGUF version of Flux can run on as little as 4GB VRAM, which means the PuLID + Flux workflow is accessible to almost anyone with a modern GPU.
| Method | Training Required | Time to First Image | VRAM (with Flux GGUF) | Character Consistency |
|---|---|---|---|---|
| LoRA Training | Yes (30–60 min) | Long | Moderate | Excellent |
| IP-Adapter | No | Fast | Moderate | Good (style-focused) |
| PuLID + Flux GGUF | No | Fast | As low as 4GB | Excellent (identity-focused) |
What You Can Create with PuLID
Once set up, PuLID + Flux opens up a range of creative workflows that were previously expensive or time-consuming:
Consistent Story Art
Generate a character across multiple scenes for a comic, story, or visual novel — same face every time.
Game Character Sheets
Create front, side, and back views of a character for game design references.
AI Avatars
Generate yourself or a custom persona in different settings, styles, and moods.
Style Exploration
Render the same character in watercolor, oil painting, anime, and photorealism — maintaining identity.
Scene Variations
Place your character in different environments — office, forest, space station — while keeping them recognizable.
Product Modeling
Create consistent model shots with the same face across different outfits or product placements.
Setting Up PuLID in ComfyUI
Here's what you need and the full installation walkthrough:
Prerequisites
- ComfyUI installed (Windows portable or manual install)
- ComfyUI Manager node installed — used to handle custom node dependencies
- Flux GGUF model already set up (see our Flux GGUF guide if needed)
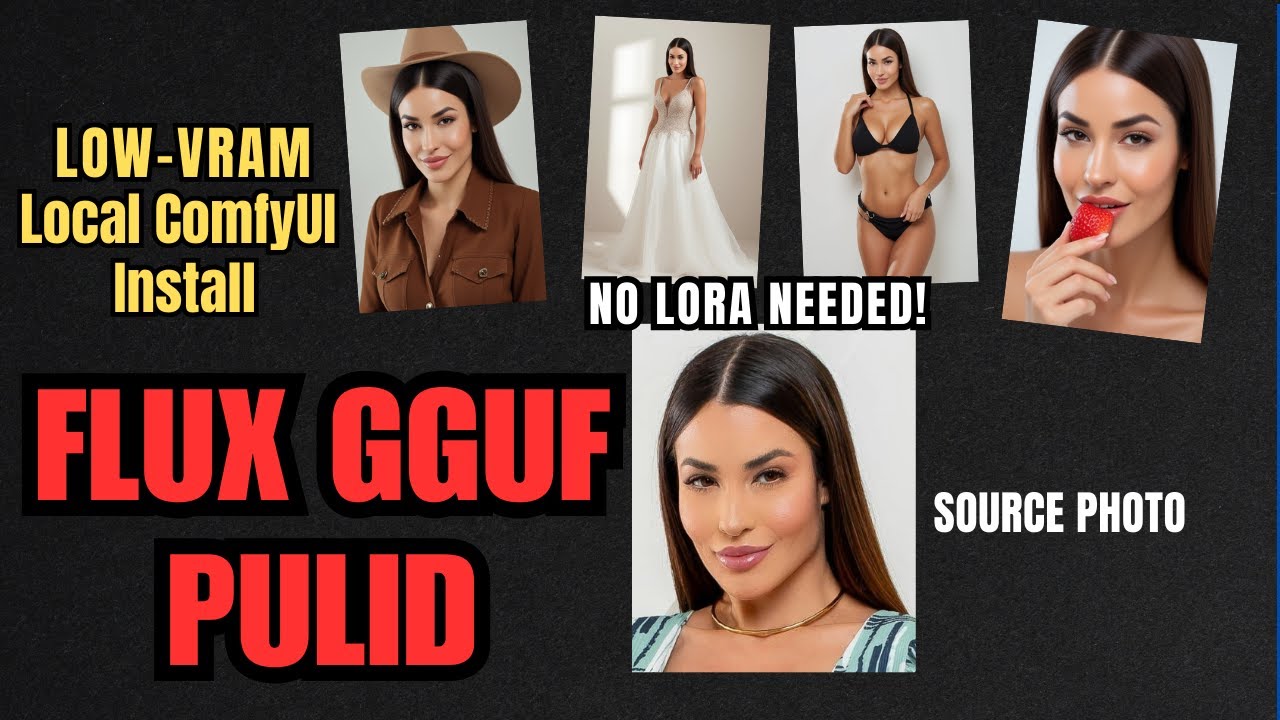
- A reference image of the character you want to replicate — clear face shot works best
Download the PuLID Flux Model
The PuLID Flux model is not available via ComfyUI Manager — you need to download it directly from Hugging Face. Search for "PuLID Flux" on Hugging Face and download the .safetensors model file.
Place the Model in the Correct Folder
Create a new folder named pulid inside your ComfyUI models directory and place the downloaded file there:
Install the PuLID Custom Node
Open ComfyUI and go to Manager → Install Custom Nodes. Search for ComfyUI PuLID Flux and install it. Restart ComfyUI after installation to load the new nodes.
Load the PuLID Workflow
Load the PuLID workflow (available in the video description). The workflow includes: GGUF Unet Loader → Dual CLIP Text Encode → PuLID Apply node (where you connect your reference image) → KSampler → VAE Decode → Save Image.
Add Your Reference Image and Generate
In the Load Image node connected to PuLID, load your reference image. Write your scene prompt in the positive text encoder. Run the workflow — PuLID will extract the identity from your reference and apply it to the generated image while following your scene description.
Tips for Best Results
Choosing a Good Reference Image
PuLID works best when the reference image has:
- A clear, well-lit face — avoid heavy shadows or obscured features
- A neutral or slight expression — extreme expressions can bleed into outputs
- Minimal background clutter — a simple background keeps the identity extraction clean
- A close-to-frontal angle — profile shots reduce consistency quality
Adjusting PuLID Strength
The PuLID node has a strength parameter (typically 0.0–1.0). Higher values produce more faithful identity reproduction but can restrict compositional creativity. A good starting range is 0.7–0.9 — strong identity adherence while still letting the prompt drive the scene.
Combining PuLID with LoRAs
PuLID and LoRAs are not mutually exclusive. You can apply a style LoRA (for anime, painting, etc.) alongside PuLID's identity control — the LoRA drives the art style while PuLID maintains the character's face and features. Keep LoRA strength moderate (0.5–0.8) to avoid overriding the PuLID identity signal.
📦 Want to skip the setup?
The Local Lab offers pre-configured AI installer packages so you can get running in minutes, not hours.
Get the Installer →